Pre-Construction Considerations: Part 3 – Financing

financing imageSome banks and mortgage lenders may not have a lot of experience with log home financing. However, since the Federal National Mortgage Association, or Fannie Mae, deemed log homes acceptable for loans, many institutions are hopping on board making it easier for log home owners to build or acquire their dream homes.

Log homes can be slightly different from their more often seen stick-built counterparts, but for the most part the loan process is similar. When examining a potential home loan, lenders are required to assess the value of other similar homes, or “comps,” in the area. For stick-built homes, this is easy. But for log homes, which aren’t on every street corner, it can be harder. The good news is Fannie Mae classifies log homes as being “rustic construction and style,” which means other homes of this Fannie Mae-approved comparable description can be used when assessing the value of log homes making it a little easier for homeowners and their financial institution. According to the Fannie Mae requirements, an appraiser is to find three homes of similar style and construction that have been built and sold in the same area as the house in question within the last 12 months. The sale price of these homes would be compared to the proposed log home to establish the log home’s market value.

In addition to financing your new home, you can also finance the land it sets on if, of course, you are approved by your financial institution. Most loans are available on a five to 30-year basis, and with excellent credit, only minimal paperwork may be required. However, some words of advice: For some institutions, your lot may need to be less than 30 acres and have utilities already on the site. Otherwise, that particular institution may consider it raw land, which may require completely different financing.

For construction purposes, it’s best to get a construction loan. Some homeowners can’t afford to pay cash for their construction costs; however if you prefer to do so, it’s is definitely possible. However, if you prefer to pay cash, you can miss out on significant tax benefits and tie up your money with little return. Yes, loans do come with those pesky interest rates, but it allows you to pay in a more comfortable manner – if you want to apply a large payment to your loan, go ahead. On the flipside, your wallet has a little room to breathe if money is tight.

If you do elect to apply for a construction loan, don’t wait too long. For some lenders, all loan documentation expires after 90 days. Since most of these lenders require approved permits, the easiest time to apply for loans is right after you have submitted all plans to your local building department. With this being said, do your loan research early in the game – plan which financial institution you will be going to, work with an officer who is familiar with construction loans, share all the details of your project with your officer, and discuss your plans early on. Who knows – your lender may even have some helpful advice to make your home building process easier!

When borrowing for construction, don’t be afraid to over-estimate and over-borrow. You can always give the money back, but you may find yourself in a serious pickle if you don’t borrow enough and run out of money before your project is over. Not only will it be inconvenient, but it will stall progress, possibly cause you to lose contractors and workers, and, in severe cases, could result in foreclosure. And never borrow exactly to the dollar of your estimates. No matter how your contractors try, they can’t always foresee or anticipate what your home project might incur. Some contractors (not all) will try hard to get you an accurate estimate, but just like any operation, you don’t know what you’re getting into until you’re already into it. Estimate high! For a construction loan, you draw as much as you need and pay interest only on what you draw, so you don’t have to use it all and you can sometimes roll that money to a smaller permanent loan, if you wish, once construction is completed.

Furthermore, budgeting too low is just one of the red flags for any lender. If a lender believes you’re not allowing enough money, then your loan may not be approved. Other red flags include over-building or under-building for the neighborhood or building something that doesn’t have high resale value. Lenders will usually set a limit on how much they will lend you based on the appraised value and total budget for the project. Homeowners must then bring cash to the table to cover any indifference between the cost to build and the total loan amount.

Financing can be a big, intimidating hurdle to cross but if you take the proper steps to cross your T’s and dot your I’s, then everything should turn out well. Just don’t rush this process. Do yourself a favor and be as careful and efficient as you can when it comes to financing and budgeting. And, most importantly, if you have questions, ASK! That’s what your loan officers, mortgage lenders, contractors, and real estate agents are there for.

Pre-Construction Considerations: Part 2 – Design and Budget

Next in our series of “Pre-Construction Considerations,” we’ll talk about two of the previously listed topics: Design and Budget. Homeowners really can’t consider one of these without the other.


Thought #1: Design + Budget = Safety

A-frame glass front cabinWe believe our friends at Jim Barna Log Homes said it best: “Close your eyes and picture the home you always wanted to build – your dream home. Keep focusing until you get a clear picture of your home. Look at it in as much detail as you can imagine. Good. Now, open your eyes… Get out your wallet….. REALITY CHECK!!!”

Yes, we all want our dream home with every bell and whistle we’ve ever imagined. During the planning stages you may think “Sure, we’ll throw in a larger-than-life stone fireplace,” or “While we’re at it, we’ll just do a complete wrap-around porch. This is, after all, our dream home. We’re going all out, right?”

Every homeowner wants to include every amazing detail they always envisioned their dream home having; however make sure your budget can handle it. We’re not saying it can’t be done, but you don’t want your dream home to turn into a financial nightmare. Design your home, but be realistic at the same time. If you don’t, things will get real pretty quick when bills start rolling in.


Thought #2: Don’t Try to Cut Corners!

One of the scariest parts of the building process is when you start to discuss materials and their prices. From the builder’s perspective, we feel ya! We don’t want to hand you a list of astronomical prices. When we’re putting together a quote at Country Mountain Homes, we try to find the most cost-effective, yet quality, way to build your home. However, many homeowners think “Well, if I can purchase the materials myself that will cut down on some of the expense.” This is not always the case. In fact, most of the time, this isn’t the case.

100_4784

Again, Country Mountain Homes always wants to try to save the client time and money, so we always suggest leaving the “heavy lifting” to us. We know what we need. We know what brands can be trusted. We know what dealers will stand behind their products. It’s second nature to us. Plus, we know exactly what we need. In the world of construction, there are sometimes many different options for one solution, and sometimes only one of those options will work for our specific situation (or work to our high-quality standards). Our point – we’ve got your back. Honestly, homeowners end up causing themselves more trouble when they try to purchase materials on their own. Leaving it up to us will ensure saved time and money, not to mention stress and headaches.


Thought #3: Be Realistic When Budgeting

Any bank, financial advisor, or real estate agent will tell you: When planning the budget for your home, your land/building expenses should represent 15 to 20 percent of your overall budget. This means add up all expenses (utilities, car loans, school loans, groceries, emergency money, etc.) Then compare your expenses with your income. While you’re doing this, remind yourself to be realistic. If vacations are important to you, budget them in. If you tend to purchase a new car every couple of years, include that expense. After all expenses are considered, your land/home payment should fit into 15 to 20 percent of your entire budget. If so, your budget should be successful, and you will have more success in getting loans, if needed. Above all, talk to your banker and/or financial advisor when planning your new home. They will help you keep a handle on reality and give you all the concrete info needed to plan successfully.


Thought #4: Design Considerations

When designing your house, the first course of action is deciding how you want the inside to function. When most of us picture our dream cabin, we see the large deck accenting a glass front A-frame with a three-car garage underneath….. *sigh* Oh yeah…. We’re talking about your dream home here… Yes, so, when designing your house, don’t necessarily think about what it’s going to look like on the outside. Think about what you want to have on the inside:

  • Number of bedrooms and bathrooms
  • Size of Kitchen
  • Kitchen Appliances
  • Floors – wood, carpet, etc.
  • Family/Living Room
  • Porches
  • Basement
  • Utilities
  • Garage
  • And the extras – hot tub on the porch, stone fireplace, chandeliers, custom staircases, custom cabinetry… the list goes on.

Interior wall After

Prioritize and price your priorities, then stack up your necessities and desires next to your budget. (Again, it’s all about the budget.) Make a list of what you can and can’t live without, and keep tweaking those lists until your find an affordable price tag. And if there’s something on your “desirables” list that just isn’t fitting into your budget, ask your builder – maybe they’ll have some tips or ideas. Country Mountain Homes is always happy to answer questions and help clients come up with solutions to make your dream home a reality.


Pre-Construction Considerations – Part I

Note: This is the first post of a series to help future homeowners consider many different factors before buying and/or building.

100_4996

Starting or considering to build a log cabin, whether it be restoring an antique or constructing a kit, is a big decision, and not one to take lightly, of course. This new home is not only your dream home, your escape from the world, but (and here’s the reality check) it’s going to take some weight out of your wallet. Don’t be scared though! With the right financial planning and budgeting, your dream home can become a reality. Furthermore, considering all aspects of the planning and building process will ensure you get the smartest bang for your buck.

So what should you consider when planning for your log home?

  • Land and Location
  • Design
  • Financing
  • Construction
  • Budget!!


Let’s talk about the first consideration – land and location.

It’s not always as simple as finding the perfect piece of land, picking out the perfect house site, and (poof!) starting construction. Not only do you need to make sure the land will support a dwelling, but you need to make sure the land will support YOUR dwelling.


Thought #1: GET THE SEPTIC SCOOP

The first thing any landowner should do before building is hire a specialist to conduct a “perk,” or percolation, test. A perk test is a process in which a piece of land is tested to see how the water percolates, or moves through the soil. Onsite Soil Evaluators and Professional Soil Scientists visit the land and conduct tests that will tell them whether the land will support a septic system, or, more specifically, what type of septic system a piece of property will require – a standard gravity-fed septic system or an alternative septic system.

To conduct a perk test, ask your local health department about your area’s specific requirements – who can conduct the tests, how many holes can they dig, depth of the holes, required absorption rates, and when these tests can be conducted. Once you gather all the information on requirements, you can then proceed by calling the appropriate professional to actually conduct the test.


Thought #2: INGRESS AND EGRESS

A property’s ingress and egress has to do with the entrances and exits to a property. This sometimes isn’t a big concern for future homeowners; however it’s definitely something that should be checked out. Local government may sometimes want to limit the amount of access points on a road whether it be for safety and traffic flow reasons or otherwise. In such a case, regulations may prevent homeowners from the amount of entry ways onto a nearby highway or the location of those entry ways. In addition, if your property is a landlocked property, or if there is another property between your property and the main highway, you will need an easement so you can have legal passageway to access your land through your neighbor’s parcel. This point also pertains to utilities, such as municipal water/sewer, electric, and phone. There’s nothing worse than starting a project only to find out the neighbor will not allow you to access electric through their property.


Thought #3: MAKE SURE YOUR FINAL HOUSE DESIGN WILL FIT YOUR PROPERTY

Security and privacy are among the top considerations when choosing the perfect piece of 104_2915property and/or house site. There is nothing worse than choosing what you believe to be the “hallelujah” spot only to begin building and realizing “Hmmm…. My porch isn’t going to sit behind that tree and have the privacy and shade like I thought it would…” Double check your measurements and communicate your plans openly and effectively with your builder so everyone is on the same page and you are certain your overall plans will, in fact, fit your property in the exact way you envision.


Thought #4: TALK TO THOSE WHO CAME BEFORE YOU

Of course, the items mentioned above are just a few of the many things to consider when choosing land and location. The other vital piece of advice is: Talk to your friends! Talk to friends who have built or who have renovated their home. Talk to your real estate agent. Talk to neighbors. Ask anyone around you what they would have done differently, what they wish they would’ve considered, or what you may have forgotten. After all, two (or twelve!) heads are better than one!

A Country Mountain Home Passion

By: Dorothy Stephenson, website designer, marketing manager, and administrative assistant of Country Mountain Homes.

I started working with Tim at Country Mountain Homes this past winter. Up until I started working for him, I knew nothing about log cabins. In fact, I probably obliviously passed log cabins on the road all the time and never noticed them. Nowadays, log cabins pop out to me like a rustic diamond – in places I’ve been before, on roads I’ve traveled a million times. I guess I just didn’t have the eyes for it then, but now I do. And that is, of course, due to Tim and Country Mountain Homes.

It’s easy to get wrapped up in the love and passion for antique log homes when you’re around Tim. One of the first projects we worked on was designing a very detailed, quote spreadsheet that would allow Tim to churn out quotes at a much faster pace taking his quote turn-around time from a month to a week! During that process I not only learned about log sizes, log lengths, chinking, and much more, but I also learned exactly how much passion Tim has not only for his craft but for his clients. Tim couldn’t go through 30 minutes of our project before he would have another story to tell me. The subjects of the stories would usually consist of Tim’s family history in the log cabin industry or, more often than not, Country Mountain Homes’ clients and their projects and stories. By the end of each day, I felt like Tim’s clients were some of my oldest and dearest friends. His fond stories and memories of them and his pride in his clients’ stories gave me a larger inner desire to be a part of this amazing company that helps people establish country, log home dreams and turn those dreams (and every little detail of them) into a reality.

Many of Tim’s clients have interesting stories. (And if you’re one of those clients, I can’t wait to meet you!) Some went through trials and tribulations during the building of their cabins while others have really unique and interesting stories to tell. One thing is for sure: During the building and renovation process, Tim’s clients become Tim’s friends and family and visa versa. I know one client’s grandchildren even refer to Tim as their “Mountain Uncle.”

Tim was recently talking about one of his clients – a lady he built a home for, who, unfortunately, passed away soon after Country Mountain Homes completed construction. Tim spoke of her fondly with a big smile on his face and twinkles in his eyes. It was almost like he was speaking of his own grandmother.

Another client, who doctors diagnosed to be terminally ill, hired Tim to build a cabin in the mountains, so the client could relax and enjoy his final days in the home he had always dreamed of. Tim did his best to complete construction as soon as possible, so his client (and new friend) could enjoy his time with his dream home for as long as he had left on the earth. As it turned out, that new client, that new friend, lived! To this day, the new friend (and client) attributes his extended life to the happiness and stresslessness of his dream home, his country mountain home. Tim, of course, modestly disagrees that he did anything special other than his job. (In fact, I’ll probably have to argue with him to publish this post – “Don’t talk about me. Talk about the company!” I can hear him now.) But onlookers, such as myself, realize what a gift Tim gave this man. May we all be blessed enough in our lifetime to give a gift like Tim gave his new friend.

Tim’s passion for his clients is unlike any other contractor or builder I’ve ever seen. These clients, his clients, are his friends, his family. Soon after I started working for Tim, he said to me “My relationship with the client doesn’t stop after construction and renovations are done. My services to the client continue long after that. It’s not just about the money, it’s about the relationship and being there for the client.” I think that will stick in my head for the rest of my life. Why wouldn’t it? Is there, after all, any other way you should treat a relationship with your client? Not in Tim’s book. In Tim’s book, it’s all about customer service and satisfaction, and that’s priceless.

An Intro to the Log Home Construction Process

Do you ever wonder what goes into building the perfect log cabin home? There are lots of elements that come into play, such as finding the perfect antique structure, relocation, repairs, finding replacement pieces from other like-period structures, chinking, roofing, and more. Here’s a quick summary of our process:

1308092-R1-024-10AStep 1: Country Mountain Homes has our eyes open on a daily basis for antique log cabins in need of TLC. When we talk to a future homeowner, we usually know right where to go to find the start of their dream cabin. We then locate the specific antique, hand-hewn cabin that fits the basic footprint of our client’s specific plan. (Most of the cabins we find and restore are from the 1700’s or 1800’s.)

Occasionally, our clients are lucky enough to have property that already offers an existing structure. In this case, we can quickly and easily start the restoration process.


Step 2: No matter whether the structure is near-site or a good distance off-site, the cabins are located and carefully inspected by our staff to evaluate their condition. We carefully remove any coverings, such as siding, paneling, or plaster, looking for any major damage or rot.


100_4634

Step 3: Then, we draw a site map noting all windows, doors, and openings carefully cataloging each log and its location in the home. (It’s kind of like keeping track of puzzle pieces.) We use number tags to identify each log and its location, so the structure will go up exactly as it was originally built. So moving one cabin hundreds of miles to its new home is not a problem!


Step 4: The next order of business is to construct a footer on the new home site to hold the structure, and then install a new sub floor system. We prefer to place the cabin directly on the foundation to ensure longevity.


IMG_0106Step 5: Using the site map we created during disassembly, we reassemble the cabin back to its original state. As we progress upwards, we repair any damage with sound replacement material from other period structures that unfortunately didn’t fair as well and had to be “pieced out.” Some logs are repaired, spliced, or replaced depending on the severity of the damage and deterioration, but once identified and handled, they’re good as new.


Step 6: After the structure is erected, we modify the window and door openings to fit our client’s specifications. We then buck, or support, the openings with pressure treated framing.


Step 7: Next, we remove all signs of insects and accumulated dirt by axing and pressure washing. The pressure washing is important not only for aesthetic reasons, but it opens, or swells, the grain of the wood allowing us to apply a natural sprayed-on insect repellant helping to kill all the existing insects in the logs and preventing new infestations. The open, wet grain helps with insecticidal penetration.


Step 8: The original cabin is now up and ready for a roof. We will either reconstruct a traditional pole rafter or bring in a new, conventional, framed roof structure. We, then, finish with a metal roof.


HPIM1465.JPGStep 9: With the weight of the roof in place, the logs find their original “happy spot” and settle back into their original notches. At this point, we install structural blocking to help stabilize the logs in place. (This blocking is within the chinking joints and will not be seen in the finished structure.) We now install the windows, door jambs, and trim.


CMH-VA-Cabins-30


Step 10: Next, is the most important part of a cabin – chinking. Chinking must be installed correctly to allow for water and rain runoff, strength for longevity, and adequate space for insulation. The chinking process is started with reinforcement wire that is nailed directly to the upper and lower log within the chinking joint. This reinforcement wire is then covered with a masonry mixture of sand, Portland cement, lime, and fiberglass.


Z Finished bathroomStep 11: The interior of the cabin is now ready to be finished off with modern conveniences – hardwood floors, custom kitchen cabinets, granite countertops, modern appliances, slate walk-in showers, and anything else to fulfill a homeowner’s dream cabin.


There you have it! Our process for putting together the perfect Country Mountain Dream Home!


History in the Making

As a young kid from West Virginia, my friends and I would build crude shelters made from existing trees, fallen branches or trees, and any other materials we could get our hands on. We would hand split poplar trees to lay across our structure and form roof sheeting, and we would then cover it with whatever debris happened to be laying around. Smaller hand split pieces would cover the sides. We built quite a few of these, and now, each time I start a new project, I can’t help but reflect back on those times – my early “log home” building days.

Tim working
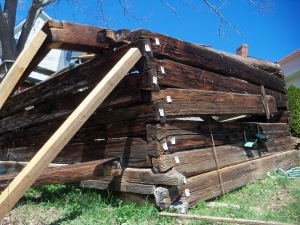
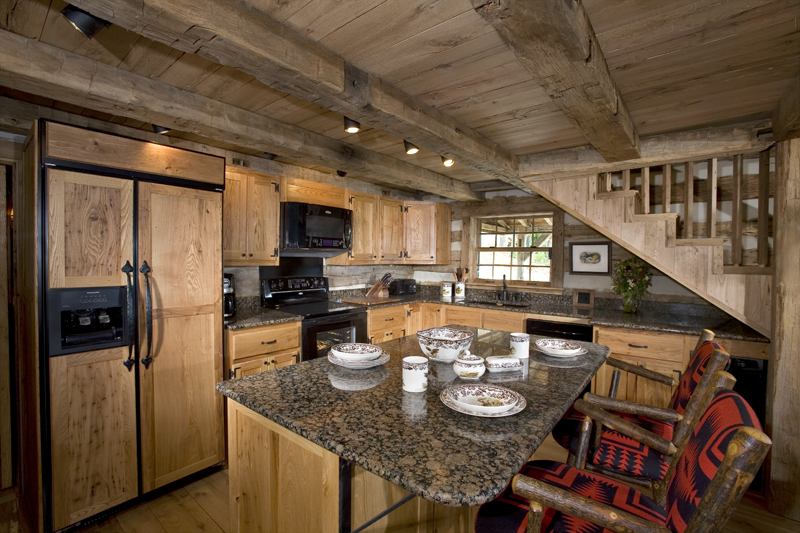
Today, with each project, I get to lay hands on logs that are somewhere in the range of 400-years-old or more. The rings found within logs tell its age, and some of the logs we have worked with have boasted as many as 350 rings with many left to count. (Some of the rings were too close to each other to see clearly.) One cabin dated back to pre-civil war times making it 150 years old; however, the tree actually started growing 350 years before that making it’s entire existence at least 500 years. Our goal is to preserve and protect the materials of these cabins to last at least another 150 years.

Trees like these are not available today. The logs our early countrymen used for cabin making were really no bigger than trees we find in forests today. The real major difference is the early trees grew under “giants” – much larger trees that caused the “average” size tree to struggle upwards for sunlight causing a much slower growth and resulting in a much denser wood. The dense wood was so hard that even insect invasion made for a very slow assault unlike today’s building materials that are more susceptible to creepy, crawling invaders.

At Country Mountain Homes, LLC., we focus on utilizing traditional, “old-world” building skills to restore and preserve 19th century, hand-hewn, antique structures. We integrate other artistic skills, such as stone masonry, blacksmithing, timber framing, post and beam, and standing seam roofs, into our restoration process.

When we build, our primary focus is to repair and preserve using materials in the exact location within the original cabin. We “recycle” everything we can from the original cabin; however if materials are damaged beyond repair, we try to replace or repair with materials from the same era.

Secondly, our intention upon completion is to have a cabin that looks natural in its setting – like it had always been there, as if the owners had found this cabin and replaced nothing more than its windows and roof.

However, inside our cabins one can step through handmade chestnut doors hung with hand-forged strap hinges and hardware and enter the beautiful warm atmosphere of rustic hand-hewn logs accompanied by modern conveniences. Some of our completed interior spaces include custom kitchen cabinets with granite countertops, stainless steel and copper appliances, beautiful balconies, stone fireplaces, and hardwood floors. Our clients’ visitors see a charming, old cabin on the outside, but once inside, they are greeted by modern, rustic elegance.

Country Mountain Homes takes great pride not only in the building and preservation of antique structures for future generations but also in knowing our work reflects the same craft practiced over 100 years ago. We hold dearly our responsibility to carry on this age-old tradition.